Click  to return to the home page at any
time.
Click ![]() to display the My
Tables page.
to display the My
Tables page.
Click ![]() to display the My Account page.
to display the My Account page.
Click ![]() to display this online help for
ASME BPVC Electronic Stress Tables.
to display this online help for
ASME BPVC Electronic Stress Tables.
The interactive ASME BPVC Electronic Stress Tables enable you to find and customize data in the same way as you do when working with spreadsheet programs such as Microsoft Excel. For example, you can select rows, sort them, find data, and filter the data that you find.
At the bottom of the home page are the following links:
About: click this link to display information about the ASME BPVC Electronic Stress Tables.
IHS Standards Store: click this link to display the IHS Standards Store web page.
Terms of Use: click this link to display the IHS web site terms-of-use page.
Privacy Policy: click this link to display the IHS privacy policy web page.
At the top of the page are four icons:
Click  to return to the home page at any
time.
Click ![]() to display the My
Tables page.
to display the My
Tables page.
Click ![]() to display the My Account page.
to display the My Account page.
Click ![]() to display this online help for
ASME BPVC Electronic Stress Tables.
to display this online help for
ASME BPVC Electronic Stress Tables.
This help topic describes how to do the following:
At the top left of the home page is a list of subscriptions to which you have access.

Click  to display the list of your subscriptions.
The home page of the ASME BPVC Electronic Stress Tables has two main parts:
At the left is displayed a list of tables that are included in your subscription.
At the right is displayed the currently selected table.
Click the name of a table in the list to display it at the right. The title of the table and the number of rows in the table are shown at the top of the page.
You can display 25, 50, 75, or 100 rows on each table page. Use the pagination control at the bottom of the table to jump to any page.

Under the Subscription menu is the Keyword box:

Use the Keyword box to search in tables for rows that contain specific data. The found rows are then filtered and displayed in the table.
When displaying filtered rows only, click Remove Search Filter to display the entire table.
When displaying the entire table, click Apply Search Filter to display only the filtered rows.
Note: You cannot use Boolean operators such as AND, OR, or NOT.
A row is displayed in the table only if all words are found in any cell of the row.
You can select specific rows to display in a table. In the column of
check boxes (the first column of the table), select the rows you want
to display, and then click Show Selected
Rows Only at the top of the table. To select all rows, in the column
header click  (Select
All). To unselect all rows, clear the Select
All check box.
When you are displaying only selected rows, click Show Hidden Rows to display all rows in the table.
You can also view and print the details of any row. Row details are shown in a separate window in text format.
Note: Tables display two columns showing row numbers. The Page No. column shows the numbers of the rows in the digital version of the table. The Line No. column shows the numbers of the rows in the hard copy version of the table.
From the current table, you can save different views of the data to My Tables. All of your current settings will be saved.
(Optional) Use the Keyword box to filter the rows you want to select.
Select the check boxes of all the rows that you want to save.
Click Save to My Tables.
Type a Name for your saved table.
(Optional) Type a Description of your saved table.
Click Save.
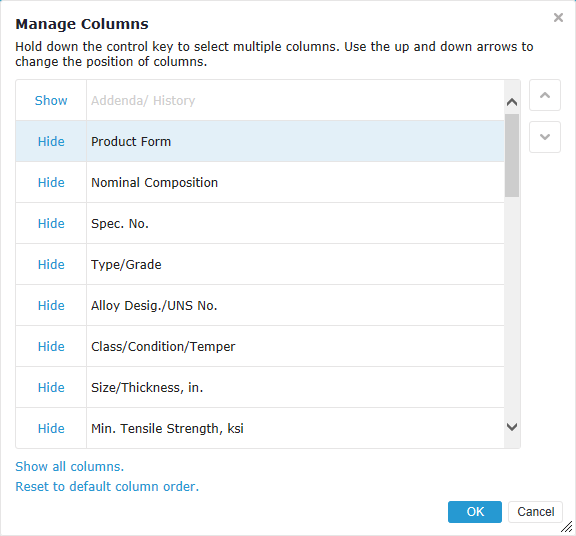
You can show or hide selected columns in any table. You can also rearrange the order in which the columns are displayed.
Click Manage Columns to display the Manage Columns dialog box:

 and
and  to move the columns to the left
(up) or right (down).
to move the columns to the left
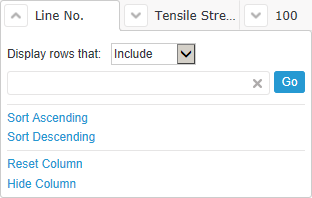
(up) or right (down).At the top of any column, click  to display commands that enable you to work with that column.

You can do the following:
Filter rows that include or exclude data that you specify in the filter box.
Sort rows in ascending or descending order by data in the column.
Reset column. This command restores the default sorting, hiding, filtering, and ordering settings of the column.
Hide the column in the displayed table. To redisplay a hidden column, click Manage Columns at the top of the table, and then click Show next to the column name.
Table notes can include summaries, column heading descriptions, references, and other information about the table. You can view general notes that apply to the entire table, and you can view row-specific notes that are associated with a particular row.
You can export the currently displayed table page and save it as a Microsoft Excel spreadsheet file (XLSX) or as a CSV file.
Export Page as XLSX to save the page as a Microsoft Excel spreadsheet file.
Export Page as CSV to save the page as a comma-separated file.